Next project…attempt to have more fun. Sort-of achieved. I spent more time conceptualizing, however this proved to be at the exense of my construction time. I’ll have to find a balance….
So, the task was to create a type of “Love-o-meter”…inspired by the sort of device you’d find at a boardwalk or shopping mall…
Taking off from the lyrics of the Good Clean Fun song “Loserdotcom” (it’s really a funny song) “…you tell me that your sex life…it has not been bland…since you’ve learned how to click and type with just one hand…” I fashioned the device as a game enclosed in a computer mouse.
The experience is that you click the buttons quickly for the duration of the game while resting your palm on the top of the mouse. A row of colored LEDs will indicate the progress of the game then display a score at the end. The score algorithm is based on the number of clicks and the change in the Galvanic Skin Response monitored at the beginning and ending of the game. It’s not really sorted yet, but the fluxuations really remind me of the seemingly arbitrary results from commercial Love-O-Meter games.
Anyway, I haven’t gotten the LED meter enclosure finished, and I’d really like to alter the GSR sensors to make them better integrate with the mouse body.
I am happy with the mouse…i was able to use Cat-6 cable to connect the mouse and the microcontroller…which was fun. I figured out how to share a common ground among all of the components in the mouse (GSR, two LEDs and two switches)…this helped to drastically reduce the number of wires needed between the mouse and the controller…and enabled the use of the 8 wire cable.
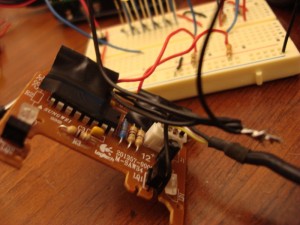
The original circuit board of the mouse, hacked up with new switches…the original ones were behaving oddly. I used the circuit board because it positions the switches precisely under the mouse buttons. Unfortunately, the existing circuit of the board interfered with my switches….really annoying until I thought to cut the existing traces on the board to isolate my circuit from the rest of the unused components…ahhh…sloppy junk parts harvesting.
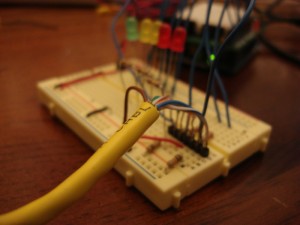
The Cat-6 cable connected to the breadboard via a set of header pins.
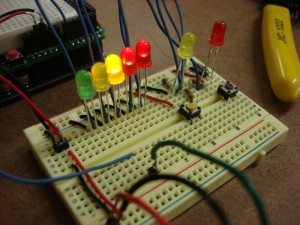
Detail of the LED meter at work.
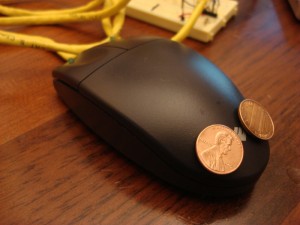
The mouse enclosure. There is a green LED on each button which illuminates when it’s button is pressed during the game. The pennies are the GSR contacts.
—
Arduino code:
// Luv-o-meter
// simple at first, just checking for the buttons and switching on the LED as necessary

int switch1 = 2;
int switch2 = 3;

int led1Pin = 5;
int led2Pin = 6;

int ledMeter[] = {
  8,9,10,11,12};

int gsrPin = 0; // analog pin
// the GSR sensor that I'm using reports fluxuations +10 when the MacBook is connected to AC power

// for comparing the start and end values of the GSR
int readGSR = 0;
int gsrBegin = 0;
int gsrEnd = 0;
int clickCount = 0; // counter for the button presses

int gameState = 0; // store the current state of the sketch

int gameScore = 0; // to tally the final score

int buttonPressed = 0;

// various timing vars
long timer = 0;
long gameDur = 10 * 1000; // the length of the game
long thinkDur = 3 * 1000; // the time for the game to "think" about the results
long resultsDur = 5 * 1000; // the duration of the results display before the sketch results
long timeout = 5 * 1000; // the timeout to return to the initial state
long gsrSmoothDur = 3 * 1000; // average the GSR readings at the beginning and end

void setup() {
  pinMode(switch1,INPUT);
  pinMode(switch2,INPUT);
  pinMode(led1Pin,OUTPUT);
  pinMode(led2Pin,OUTPUT);

  for(int i=0;i<5;i++){
    pinMode(ledMeter[i],OUTPUT);
  }

  Serial.begin(9600);
}

void loop() {
  int read1 = digitalRead(switch1);
  int read2 = digitalRead(switch2);

  // readGSR = analogRead(gsrPin);
  // Serial.println(readGSR);

  /*
  Serial.print("button 1: ");
   Serial.println(read1);
   Serial.print("button 2: ");
   Serial.println(read2);
   */
  switch(gameState){
  case 0: // waiting to start the game

    // begin if either button is pressed:
    if(read1 == LOW || read2 == LOW) {
      gameState = 1; // set the approriate game state
      clickCount = 0; // rest the counter variable

      // turn on the button LEDs to acknowledge the press:
      digitalWrite(led1Pin,HIGH);
      digitalWrite(led2Pin,HIGH);

      countDown(); // display the starting sequence

      // turn off the button LEDs to begin:
      digitalWrite(led1Pin,LOW);
      digitalWrite(led2Pin,LOW);

      timer = millis(); // reset the timer

      // read the start value of the GSR.
      // need to do this better to smooth the results:
      gsrBegin = analogRead(gsrPin);
    }
    break;

  case 1: // playing the game
    if(millis() - timer > gameDur){ // the game is over.
      digitalWrite(led1Pin,LOW);
      digitalWrite(led2Pin,LOW);

      // need to do this better. need to smooth the GSR values
      // now being done at the end of the game state, using a timer.
      //gsrEnd = analogRead(gsrPin);

      gameState = 2; // change the game state to calculate the results
      timer = millis();
    }
    else {
      // do the game stuff:
      // instant feedback - illuminate the button LEDs:
      if(read1 == LOW || read2 == LOW) {
        // ensure that one press / release is counted:
        if(!buttonPressed){
          digitalWrite(led1Pin,1-read1);
          digitalWrite(led2Pin,1-read2);

          clickCount++;
          buttonPressed = 1;
        }
      }
      else {
        digitalWrite(led1Pin,LOW);
        digitalWrite(led2Pin,LOW);
        buttonPressed = 0;
      }

      // use the meter as a game progress:
      int progress = (int) map(millis()-timer,0,gameDur,0,5);
      levelMeterNoDelay(progress);

      readGSR = analogRead(gsrPin);

      //smooth the beginning of the GSR:
      if(millis()-timer < gsrSmoothDur) {
        gsrBegin = (gsrBegin+readGSR)/2;
      }

      //smooth the end GSR readings:
      if(millis()-timer+gsrSmoothDur > gameDur){
        gsrEnd = (gsrEnd+readGSR)/2;
      }

      // send data only when asked for data:
      if (Serial.available() > 0) {
        // read the incoming byte:
        int incomingByte = Serial.read();

        // wait for the 'A' char
        if(incomingByte == 65){
          // return the GSR:
          Serial.println(readGSR);
        }
      }
    }
    break;

  case 2: // display the results of the game
    gameScore = calculateScore();
    displayThink(); // for testing the circuit
    levelMeter(gameScore);
    gameState = 3;
    timer = millis();
    break;

  case 3: // the game has ended, hold on the score display
    if(millis() - timer > resultsDur) {
      gameState = 0;
      meterOff();
      timer = millis();
    }
    break;

  }

}

void blinkOn(int led) {
  digitalWrite(led,HIGH);
  delay(100);
  digitalWrite(led,LOW);
  delay(50);
  digitalWrite(led,HIGH);
  delay(100);
}

void blinkOff(int led) {
  digitalWrite(led,LOW);
  delay(50);
  digitalWrite(led,HIGH);
  delay(100);
  digitalWrite(led,LOW);
  delay(50);
}

void displayThink() {
  // run some kind of blinking rhythm
  // cycle through the array of LEDs
  // assuming that the array is 5 units long
  for(int j=0;j<2;j++){
    for (int i =0;i<5;i++){
      blinkOn(ledMeter[i]);
      delay(10);
    }

    for (int i =0;i<5;i++){
      blinkOff(ledMeter[i]);
      delay(10);
    }
    delay(5);
  }

}

void levelMeter(int units){
  units = constrain(units,0,5);

  for (int i =0;i<units;i++){
    blinkOn(ledMeter[i]);
    delay(50);
  }
}

void levelMeterNoDelay(int units){
  units = constrain(units,0,5);

  meterOff();
  for (int i =0;i<units;i++){
    digitalWrite(ledMeter[i],HIGH);
  }
}

void meterOff() {
  // turn them all off, immediately
  for (int i =0;i<5;i++){
    digitalWrite(ledMeter[i],LOW);
  }
}

void meterOn() {
  // turn them all on, immediately
  for (int i =0;i<5;i++){
    digitalWrite(ledMeter[i],HIGH);
  }
}

void meterBlink() {
  meterOff();
  delay(50);
  meterOn();
  delay(50);
}

int calculateScore() {
  // calculate the score based on the number of presses and the GSR difference:
  int theScore = 0;

  // simple for the initial test, just work out a range based on the number of clicks
  // give a score of at least 1
  // theScore = (int) map(clickCount,0,100,1,5);

  // using GSR:
  int gsrDiff = gsrEnd - gsrBegin; // assuming that the GSR will increase over the test
  theScore = (int) map(gsrDiff,0,clickCount,1,5);
  if(theScore < 1) theScore = 1;

  Serial.print("GSR begin: ");
  Serial.println(gsrBegin);
  Serial.print("GSR end: ");
  Serial.println(gsrEnd);
  Serial.print("GSR diff: ");
  Serial.println(gsrDiff);
  Serial.print("Click count: ");
  Serial.println(clickCount);
  Serial.print("Score: ");
  Serial.println(theScore);
  Serial.println("---");

  return theScore;
}

void countDown() {
  meterBlink();
  delay(100);
  meterBlink();
  delay(100);
  meterBlink();
  delay(100);

  // countdown to the start
  for (int i=4;i>=0;i--){
    blinkOff(ledMeter[i]);
    delay(50);
  }
}


Leave a Reply
You must be logged in to post a comment.