[Also available at ITPedia. Watch video of the BarCampNYC4 presentation.]
This is an overview of getting set up using openFrameworks for iPhone development.
What is openFrameworks?
openFrameworks is a “a C++ library for creative coding”. It shares a similar philosophy with Processing (as a library for Java). The intended audience “are folks using computers for creative, artistic expression, and who would like low level access to the data inside of media in order manipulate, analyze or explore.”
There are good resources for reading more about it below, under the Resources heading. This article assumes basic knowledge of programming and of the Xcode development environment. You can simply follow along and launch the demo app, but you should really read the resources to understand the structure of a typical openFrameworks-based application.
Why?
iPhone native application development is typically done in Objective-C. Not pressing the merits and detractions of Obj-C, but it’s *another* language to learn. If you have code / experience working in C++ then you can use oF to migrate those programs to the iPhone somewhat painlessly. Arguably easier to begin working with – espeically if you’re coming from experience with Processing.
Why not?
However, if you already develop in Objective-C, then maybe you don’t need to use oF. OpenFrameworks is not as well documented as Objective-C (even though Apple’s docs are as dense as the proverbial stereo instructions joke). Certain applications are not as suitable (lots of hierarchal views) It’s very easy to overwhelm the iPhone if porting desktop oF code over.
Ultimately, however, this eliminates 90% of Obj-C. Still need to use Obj-C (or Obj-C++) to use iPhone interface widgets. Don’t worry about it right now.
Credit
The openFrameworks team did great work under the hood of version 006 to enable this. ofxiphone was compiled by Lee Byron, Memo Akten, Damian Stewart, Zach Gage, and the core OF team (Zach, Theo, and Arturo).
Resources
Get the necessary software for development.
- iPhone development tools
- http://developer.apple.com/iphone/ – create (free) iPhone developer account / get iPhone SDK (includes Xcode)
- openFrameworks
- http://www.openframeworks.cc/download – iPhone version
- Start reading
Basic set-up
- Install openFrameworks in the Developer folder (out of habit)
- oF examples live inside the “of_preRelease_v0.06_iphone/apps/examples” folder
- You can create an alternative folder within “apps” for your work (I use “sketchbook”)
- Tip! Install one of the example projects in the Xcode template directory
- “/Developer/Library/Xcode/Project Templates/Other”
- You can then start a new project at File>New Project… then select Other in the left panel.
- Alternative Tip! Install Memo’s openFrameworks project templates
- Download the templates.
- Unzip the file and copy the openFrameworks folder to:
- “/Developer/Library/Xcode/Project Templates/”
Example Application

- Memo’s simple demo
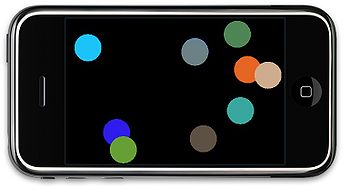
- Improved demo – based on the Touch+Accel demo in the examples folder.
- Enables multitouch – select up to five objects at once
- Can toss objects around screen.
- Download the demo code. (remember to install in apps/sketchbook)
- Select the Simulator in the Active SDK target menu:

- Select Build and Go to compile, install in the Simulator and launch the app:

Important bits. The include lines in testApp.h enable the iPhone-specific methods:
#include "ofMain.h"
#include "ofxMultiTouch.h"
#include "ofxAccelerometer.h"
Initialize multitouch and accelerometer in testApp::setup() in testApp.cpp:
ofxAccelerometer.setup();
ofxMultiTouch.addListener(this);
ofxMultiTouch provides the following methods:
void touchDown(float x, float y, int touchId, ofxMultiTouchCustomData *data = NULL);
void touchMoved(float x, float y, int touchId, ofxMultiTouchCustomData *data = NULL);
void touchUp(float x, float y, int touchId, ofxMultiTouchCustomData *data = NULL);
void touchDoubleTap(float x, float y, int touchId, ofxMultiTouchCustomData *data = NULL);
touchId is an identifier of which touch in the current set of multiple touches is currently being evaluated. The Thing class in the demo has an instance variable which stores this, so the object knows which touch it should be responding to.
Currently ofxMultiTouchCustomData is just a struct with the total number of touches in the current set. For example:
if( data->numTouches >= 2 ) {
   // do stuff only when two (or more) touches are down
}
ofxAccelerometer.getForce() returns an ofPoint (x,y,z) of the current force.
Starting a new Project
- Create a new Project (using above template picker)
- Save the project in the apps/sketchbook folder with a unique name
- Change the Application name (“oF iPhone” by default)
- Select the Target “iPhone oF” from the “Groups & Files” panel on the left
- File>Get Info
- Select the Build tab
- Scroll down to “Product Name” and customize it as desired. Be aware that long names will be truncated in the iPhone Springboard
- Customization
- Change Default.png and Icon.png in the data folder.
Modify testApp.h and testApp.cpp as necessary. Feel free to build out extra classes as your project needs them.
Installing on Device
You need to get a paid ($99 annually) iPhone Developer Account to install any software on the device, even your own for development. Follow instructions on the iPhone Developer Program Portal. (Somewhat confusing at first-pass)
- Generate a development certificate
- Register your device
- Create an App ID (you can use a wildcard for development of several apps: com.yourname.* )
- Provision your device
Again, follow the instructions on the Portal.
- Project changes for Device installation:
- Change Info.plist – add App ID (com. yourname.*)
- Select the Target > Get Info > Code Signing. Change to your certificate (iPhone Developer: yourname)
- Device Provisioning. Drag the downloaded device provisioning file onto the Xcode Organizer.
Adding UIKit elements
Download the above multitouch demo with a UIView added for preferences.
You can combine both C++ and Objective-C into one file.
- Add the UIKit headers to testApp.h:
#import <UIKit/UIKit.h>
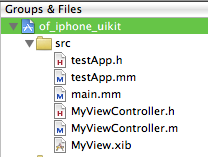
- Change the file extension of main.cpp and testApp.cpp to .mm (as well as any other custom classes that include both).
- Easiest to change the file names in the Finder, drag the renamed files back into Xcode then remove the .cpp files (should be red)

Best practice seems to be to add a UIView (or UIViewController’s view) as a subview of the application’s window. The window is accessible by:
[[UIApplication sharedApplication] keyWindow]
The demo uses a subclass of UIViewController called MyViewController to load an Interface Builder created view. In testApp::setup():
// for the UIView GUI stuff:
myViewController = [[MyViewController alloc] initWithNibName:@"MyView" bundle:nil];
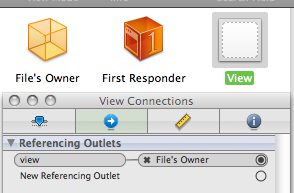
Important! MyView.xib needs to be aware of it’s UIViewController, called MyViewController in the demo. This sounds a bit confusing, but is straightforward – follow along with the screenshots below.
- Set the Class property of File’s Owner to MyViewController:

- Then connect the File’s Owner view outlet to the UIView’s view property:

- Display the view by inserting the view into the window (this is in testApp.mm):
[[[UIApplication sharedApplication] keyWindow] addSubview:myViewController.view];
- Dismiss it by removing the view from the window (also in testApp.mm):
[myViewController.view removeFromSuperview];
- The demo actually uses a method in the view controller to remove itself, which looks like (MyViewController.m):
[[self view] removeFromSuperview];
- You can also add animated transitions and all the other UIKit goodies…but that’s for another day.
- You can use standard IBOutlet and IBAction objects to send signals between your view controls and program logic. That is outside of the scope of this overview. So is the Model-View-Controller (MVC) paradigm…but I’d create a singleton data object…and have your view controller and testApp classes access it…if I were you, and all.
Leave a Reply
You must be logged in to post a comment.