Started up working with basic motor control, ended up hacking into an existing Halloween candy bowl talking skull.
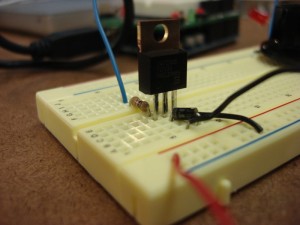
Back to the beginning – controlling a motor with the Arduino. So, the first step was getting acquainted with transistors to isolate the microcontroller’s power supply from the motor’s. The TIP120 is simple to use, if frustratingly similar looking to the 7805 power regulator. Below is a pic of the circuit for simple variable speed motor control. There is no H bridge here, so the motor only spins in one direction. The blue wire goes to the Arduino pin (digital PWM), red/black to the motor and +5v/transistor and the other black wire connects the transistor to ground. Base -> microcontroller, Collector -> motor, Emitter -> ground.
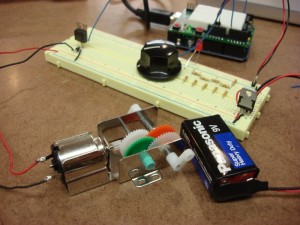
Doing this allows the circuit to have separate power for the motor…which can just barely be powered adequately by the Arduino directly. Running it off a 9V wall wart (through a 5V regulator) performs much better. Even a 9V battery works ok. (ignore the resistors on the breadboard below…they are a resistor ladder from a previous experiment)
Once the basic control was established, it was pretty simple to read a flex sensor and use it to control the speed of the motor.
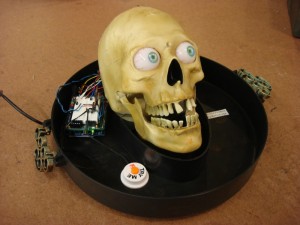
There has been talk of an ITP Haunted House for Halloween this year…which got me thinking about hacking the plethora of toys available. I found a great talking skull candy bowl at a department store across Broadway from school. It has a piezo and a photodiode sensor for detecting movement and light change. It also had an on/off switch and another switch that turned enabled the sensors.
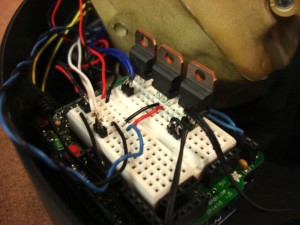
The mechanics of the motors and movement seemed solid and I didn’t want to mess with that. However, I thought that it would be neat to extend control of the device to an external interface. The result is that I’ve spliced transistors into the switches of the toy’s existing circuit.
The Arduino can be controlled via serial commands and will also report the status of switches. I also threw in a timer function to trigger the skull at a set interval. Here’s an early demo of the control:
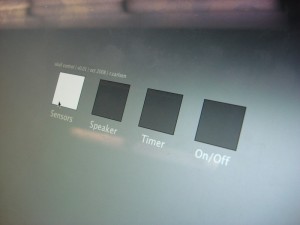
I’d like to have some kind of network interface for controlling this…it would be neat for some physically distant event to trigger the skull. For the meantime I have a Processing sketch as a visual interface to the serial commands.
Arduino code:
// hacking the skull toy
/*
the toy has a piezo and photodiode for activting it
there is also a momentary switch for turning it on and off

there are two motors, two LEDs and a speaker all driven by an IC

it is operated by about 4.5V (three AA batteries) and seems to draw up to 1A - usually 800mA.
can run it off a 9V wall wart through a 7508 regulator, although the heat sink gets really hot

there is a switch to enable the sensors.

thinking of overriding ond of the sensors to enable the microcontroller to activate the toy
*/

int switchPin = 2;
int timedFlag = 0;

int speakerPin = 3;
int speakerFlag = 1;

int sensorsPin = 4;
int sensorsFlag = 0;

static int TIMER_DUR = 15000;

long timer;

void setup(){
Serial.begin(9600);
pinMode(switchPin,OUTPUT);
pinMode(sensorsPin,OUTPUT);
pinMode(speakerPin,OUTPUT);
}

void loop(){
int var = digitalRead(switchPin);

if(timedFlag == 1){
if(millis() - timer > TIMER_DUR){
digitalWrite(switchPin, HIGH);
// Serial.println("Switch went high");
delay(20);
digitalWrite(switchPin,LOW);
// Serial.println("Switch went low");
timer = millis();
}
}

if(Serial.available()>0) {
int incoming = Serial.read();

switch(incoming){
case 'a':
Serial.println(var);
break;
case 's':
if(sensorsFlag == 0){
sensorsFlag = 1;
// Serial.println("Sensors on");
}
else {
sensorsFlag = 0;
// Serial.println("Sensors off");
}
digitalWrite(sensorsPin,sensorsFlag);
break;
case 't':
if(timedFlag == 0){
timedFlag = 1;
// Serial.println("Timer on");
}
else {
timedFlag = 0;
// Serial.println("Timer off");
}
break;

case 'r':
// send status report:
// Human readable:
/*
Serial.print("Sensors: ");
Serial.println(sensorsFlag);
Serial.print("Speaker: ");
Serial.println(speakerFlag);
Serial.print("Timer Flag: ");
Serial.println(timedFlag);
Serial.print("Timer: ");
Serial.println(millis()-timer);
*/

// for talking to Processing
Serial.print(sensorsFlag,BYTE);
Serial.print(speakerFlag,BYTE);
Serial.print(timedFlag,BYTE);
Serial.print(0,BYTE);
break;

case 'o':
// toggle on/off
digitalWrite(switchPin, HIGH);
delay(30);
digitalWrite(switchPin,LOW);
//Serial.println("On/Off toggled");
break;

case 'm':
// toggle the speaker
if(speakerFlag == 0){
speakerFlag = 1;
//Serial.println("Speaker on");
}
else {
speakerFlag = 0;
//Serial.println("Speaker off");
}
digitalWrite(speakerPin,speakerFlag);
break;

}
}

}
And the Processing code:
import processing.serial.*;

// control the skull via serial
// 2008 r. carlsen

/*
// call/response:
 Send 'r' (report)
 Sensors: 0|1
 Speaker: 0|1
 Timer Flag: 0|1
 Timer: long

 's' toggles sensors
 'o' immediately toggles on/off
 'm' toggles the speaker
 't' toggles the 15 second timer

 */

PFont font;
Serial myPort;
String inString;    // Incoming serial data
int skullStatus[] = new int[4];
float margin = 75;

boolean firstRun = true;

float buttonLoc[][] = new float [4][4]; // l,t,r,b

void setup() {
  size(500,150);

  String portName = Serial.list()[0];
  myPort = new Serial(this, portName, 9600);

  font = createFont("SansSerif",18);
  textFont(font);
}

void draw() {
  background(102);

  // query the device and wait for the arduino to initialize
  if(firstRun){
    if(millis() > 2000){
      getReport();
      firstRun =false;
    }
    else {
      // silly label
      textAlign(RIGHT);
      textSize(10);
      fill(204);
      text("[loading...]", width-15,15);
    }
  }

  for(int i=0;i<4;i++){
    // query the status

    int curData = skullStatus[i];

    float x = lerp(margin,width-margin,i/3f);
    float y = height/2 - 10;

    fill(map(curData,0,1,50,255));
    stroke(0);

    rectMode(CENTER);
    rect(x,y,margin,margin);

    buttonLoc[i][0] = x-margin/2;
    buttonLoc[i][1] = y-margin/2;
    buttonLoc[i][2] = x+margin/2;
    buttonLoc[i][3] = y+margin/2;

    // display labels
    fill(204);
    textFont(font);
    textAlign(CENTER);
    String label;

    switch(i){
    case 0:
      label = "Sensors";
      break;
    case 1:
      label = "Speaker";
      break;
    case 2:
      label = "Timer";
      break;
    default:
      label = "On/Off";
      break;
    }

    text(label,x,y+65);
  }

  // silly label
  textAlign(LEFT);
  textSize(10);
  fill(204);
  text("skull control | v0.01 | oct 2008 | r.carlsen", 15,15);

}

void serialEvent(Serial myPort) {
  // now assuming 4 byte messages
  // sensors|speaker|timer|unused
  if(myPort.available() > 3){
    inString = myPort.readString();
    //println(inString);
    for(int i=0;i<inString.length();i++){
      skullStatus[i] = int(inString.charAt(i));
    }
    //println(skullStatus);
  }
}

void keyPressed(){
  switch(key){
  case 's':
  case 'o':
  case 'm':
  case 't':
    myPort.write(key);
    getReport();
    break;
  case 'r':
    getReport();
    break;
  }
}

void mousePressed() {
  for(int i=0;i<buttonLoc.length;i++){
    if(mouseX>=buttonLoc[i][0] && mouseY >= buttonLoc[i][1] && mouseX <= buttonLoc[i][2] && mouseY <= buttonLoc[i][3]){
      // we've been pressed!

      //println("button pressed!");

      switch(i){
      case 0:
        // sensors
        myPort.write('s');
        break;
      case 1:
        // mute
        myPort.write('m');
        break;
      case 2:
        // timer
        myPort.write('t');
        break;
      case 3:
        // on/off
        myPort.write('o');
        break;
      }
      // update the status report
      getReport();
    }
  }
}

void getReport() {
  // request report
  myPort.write('r');

}


Leave a Reply
You must be logged in to post a comment.